Colourful Norwich skyline illustration

Michael Sage

IT, Digital & Culture

Expand a hard disk with LVM

The “hardware” part, “physically” adding diskspace to your VM

Increasing the disk size can be done via the vSphere Client, by editing the settings of the VM (right click > Settings).

If the “Provisioned Size” area (top right corner) is greyed out, consider turning off the VM first (if it does not allow “hot adding” of disks/sizes), and check if you have any snapshots made of that VM. You can not increase the disk size, as long as there are available snapshots.

Partitioning the unallocated space: if you’ve increased the disk size

Once you’ve changed the disk’s size in VMware, boot up your VM again if you had to shut it down to increase the disk size in vSphere. If you’ve rebooted the server, you won’t have to rescan your SCSI devices as that happens on boot. If you did not reboot your server, rescan your SCSI devices as such.

Then rescan the bus.

~$ 'echo 1 > /sys/class/block/sda/device/rescan'

Create the new partition

Once the rescan is done (should only take a few seconds), you can check if the extra space can be seen on the disk.

~$  fdisk -l

Disk /dev/sda: 10.7 GB, 10737418240 bytes
255 heads, 63 sectors/track, 1305 cylinders
Units = cylinders of 16065 * 512 = 8225280 bytes

Device Boot      Start         End      Blocks   Id  System
/dev/sda1   *           1          13      104391   83  Linux
/dev/sda2              14         391     3036285   8e  Linux LVM

So the server can now see the 10GB hard disk. Let’s create a partition, by start fdisk for the /dev/sda device.

~$  fdisk /dev/sda

The number of cylinders for this disk is set to 1305.
There is nothing wrong with that, but this is larger than 1024,
and could in certain setups cause problems with:
1) software that runs at boot time (e.g., old versions of LILO)
2) booting and partitioning software from other OSs
(e.g., DOS FDISK, OS/2 FDISK)

Command (m for help): n

Now enter ‘n’, to create a new partition.

Command action
e   extended
p   primary partition (1-4)
 p

Now choose “p” to create a new primary partition. Please note, your system can only have 4 primary partitions on this disk! If you’ve already reached this limit, create an extended partition.

Partition number (1-4): 3

Choose your partition number. Since I already had /dev/sda1 and /dev/sda2, the logical number would be 3.

First cylinder (392-1305, default 392): 
Using default value 392
Last cylinder or +size or +sizeM or +sizeK (392-1305, default 1305): 
Using default value 1305

Note; the cylinder values will vary on your system. It should be safe to just hint enter, as fdisk will give you a default value for the first and last cylinder (and for this, it will use the newly added diskspace).

Command (m for help): t
Partition number (1-4): 3
Hex code (type L to list codes): 8e
Changed system type of partition 3 to 8e (Linux LVM)

Now type t to change the partition type. When prompted, enter the number of the partition you’ve just created in the previous steps. When you’re asked to enter the “Hex code”, enter 8e, and confirm by hitting enter.

Command (m for help): w

Once you get back to the main command within fdisk, type w to write your partitions to the disk. You’ll get a message about the kernel still using the old partition table, and to reboot to use the new table. The reboot is not needed as you can also rescan for those partitions using partprobe. Run the following to scan for the newly created partition.

~$ partprobe -s

If that does not work for you, you can try to use “partx” to rescan the device and add the new partitions. In the command below, change /dev/sda to the disk on which you’ve just added a new partition.

~$ partx -v -a /dev/sda

If that still does not show you the newly created partition for you to use, you have to reboot the server. Afterwards, you can see the newly created partition with fdisk.

~$  fdisk -l

Disk /dev/sda: 10.7 GB, 10737418240 bytes
255 heads, 63 sectors/track, 1305 cylinders
Units = cylinders of 16065 * 512 = 8225280 bytes

Device Boot      Start         End      Blocks   Id  System
/dev/sda1   *           1          13      104391   83  Linux
/dev/sda2              14         391     3036285   8e  Linux LVM
/dev/sda3             392        1305     7341705   8e  Linux LVM

Extend your Logical Volume with the new partition

Now, create the physical volume as a basis for your LVM. Please replace /dev/sda3 with the newly created partition.

~$  pvcreate /dev/sda3
Physical volume "/dev/sda3" successfully created

Now find out how your Volume Group is called.

~$  vgdisplay
--- Volume group ---
VG Name               VolGroup00
...

Let’s extend that Volume Group by adding the newly created physical volume to it.

~$  vgextend VolGroup00 /dev/sda3
Volume group "VolGroup00" successfully extended

With pvscan, we can see our newly added physical volume, and the usable space (7GB in this case).

~$  pvscan
PV /dev/sda2   VG VolGroup00   lvm2 [2.88 GB / 0    free]
PV /dev/sda3   VG VolGroup00   lvm2 [7.00 GB / 7.00 GB free]
Total: 2 [9.88 GB] / in use: 2 [9.88 GB] / in no VG: 0 [0   ]

Now we can extend Logical Volume (as opposed to the Physical Volume we added to the group earlier). The command is “lvextend /dev/VolGroupxx /dev/sdXX“.

~$  lvextend /dev/VolGroup00/LogVol00 /dev/sda3
Extending logical volume LogVol00 to 9.38 GB
Logical volume LogVol00 successfully resized

If you’re running this on Ubuntu, use the following.

~$  lvextend /dev/mapper/vg-name /dev/sda3

All that remains now, it to resize the file system to the volume group, so we can use the space. Replace the path to the correct /dev device if you’re on ubuntu/debian like systems.

~$  resize2fs /dev/VolGroup00/LogVol00
resize2fs 1.39 (29-May-2006)
Filesystem at /dev/VolGroup00/LogVol00 is mounted on /; on-line resizing required
Performing an on-line resize of /dev/VolGroup00/LogVol00 to 2457600 (4k) blocks.
The filesystem on /dev/VolGroup00/LogVol00 is now 2457600 blocks long.

And we’re good to go!

~$  df -h
Filesystem            Size  Used Avail Use% Mounted on
/dev/mapper/VolGroup00-LogVol00 9.1G 1.8G  6.9G  21% /
/dev/sda1              99M   18M   77M  19% /boot
tmpfs                 125M     0  125M   0% /dev/shm

Unifi Video Mongodb remove

Occasionally you hit an issue with a unifi camera and it won’t connect or remove from the controller. The easiest / only way to fix this is to manually remove it from the database.

SSH into the NVR and find all the cameras:

mongo localhost:7441/av
db.camera.find()
db.camera.find({}, {_id: 0, name: 1, uuid: 2})

Look for the camera in question, we will want the UUID

"Driveway", "uuid" : "1fbfb420-a091-3c8f-b184-e43ec862b14a"

Then remove it, exit the tool, and restart UFV

db.camera.remove({uuid:"1fbfb420-a091-3c8f-b184-e43ec862b14a"})
exit
service unifi-video stop; service unifi-video start

I admire….

People I follow..

As most of you will be aware, I find management and leadership courses to be a bit futile. Yes, you do pick up good ideas and practices, it is a great way to network with your peers, but has anyone come out a reformed leader / manager… not that I’ve seen. Worse than that, when under stress people revert back to the manager they are. Having said that, in my time in leadership roles I have come across a couple of real gems of people, who I admire and respect, they talk sense (to me). I will update this page if any new ones pop up!

I first came across Simon Sinek a few years ago on a random management course I had been sent on. For some reason he stuck, the way he talks, the way that some of his talk is science (some of it is pseudo science and junk, so be careful). The way he talks and the passion behind it. He is one of my all time favourite TED talkers.

My personal favourite video is this one. His books are a good read and he is constantly tweaking and refining his work.

Dave Coplin is an absolute tech legend. Having worked at Microsoft for approximately a billion years, he was their Chief Envisioning Officer, he totally embraces the fact that we need to change the way we work. We need to accept technical change and more than that we need to embrace it. 

His book Business Reimagined is short, but totally worth a read. The video Re-imagining work shifts in the digital revolution is really worth a watch.

Many of you know my absolute IT hero is Grace Hopper.

She was a truly talented computer scientist, in a time before computer science. She coined the term “bug” when she found a moth in one of her computers that wasn’t working. Her lectures were easy to follow, even on the most complex of subjects including on how far data travels in a second which she used chucks of physical cable to illustrate. 

She was a decorated Navy veteran and in 1986 she was the oldest active-duty commissioned officer in the US Navy.

A true pioneer. She also gave the world one of my favourite quotes of all time

“It’s to ask forgiveness than it is to get permission.”

My IT Titans

OK, this one is a cheat, but I wanted to reflect the people who I respect in my industry… All of them for different reasons, but mostly because they are amazing technologists, leaders, business owners and actual people.

  • Bill Gates – Microsoft
  • Michael Dell – Dell
  • Steve Wozniak – Apple
  • The other Steve – Apple
  • Bill Hewlett – HP
  • David Packard – HP

Chelmsford – The Digital Journey So Far


 The Digital Journey So Far was published in Public Sector Executive in the Apr/May 2018 edition.

Back in 2016 we decided we had had enough of being tied into expensive contracts with the big suppliers and, with this, our inability to move agilely as an organisation. We took matters into our own hands in a programme of digital transformation that would leave the council as a master of its own destiny.

When this programme is complete, we intend to only be using our own internal staff to run, maintain and develop this new platform. We think this programme will take us five years to deliver completely, and we predict it will deliver us significant savings, both financially and in resource. 

This is underpinned by an entirely new technology platform using the building blocks in two core products, Office 365 and Dynamics 365.

In May 2017, we started a realignment of our IT function to ensure we had a team that was able to deliver this new programme. We are proud that during this realignment we were able to attract some amazing talent into the organisation and continued to grow our existing talent with internal promotions. We wanted to run this project as our own and not be stuck with a partner who didn’t “get us,” and to this end the project itself has attracted a number of industry-leading contractors who wanted to come and work with us. This has, in turn, inspired the team and led to better buy-in.

With the wider council, we have massively increased the amount of information we give them, including a fortnightly newsletter and monthly “buzz days” which deep-dive some of the core components in an interactive way.

Office 365 is the first major strand of the project: it becomes the core IT offering and affects all the workforce and councilors. In the past year we have rolled out some of its core components and have started enabling the business to work where and whenever they want. This has allowed teams within the council to start trialling their own ideas, and a number of services have made their own mini solutions. 

With the migration to Exchange online and OneDrive for Business complete, we have started the project to migrate our telephone system to Skype for Business and our shared file infrastructure to SharePoint. We are aiming to have the council fully migrated to the new platform by the end of the calendar year.

CRM is the most complex part of the programme: it aims to take the council’s current back-office systems and migrate them to a single platform, giving a single view of the customer. The beginning of the year saw us build our own platform in Azure, but by the summer it was clear that we would be better on the hosted Dynamics 365 platform. This work was completed in the summer and the team started building our foundational capabilities. Microsoft upgraded the platform and we migrated to the new build with minimal effort, the permanent team really understanding how rapid the development and deployment is. 

In the first year we only experienced one hiccup: one of our systems reached end of life during the year, and this became a distraction. We attempted to accelerate elements of the programme, but in the end this led us into a situation where we had wasted resource on focusing on an issue that we couldn’t resolve in the time we had. Once we successfully used our contingency plans, we took time to reflect and stabilise the foundation work we had already completed – ready for year two.

Digital journey so far

Personality Profiles

Personality Profiles

During my time in the public and private sector I have been subject to a number of personality profiling exercises. In general these sessions normally end up descending into a humourous look at yourself and co-workers, is there any real value of these in a functional team? I would argue not. It might cement some understanding but nothing actually changes.  In a dysfunctional team the answer might be different, but my argument would be, if a team is dysfunctional it is up to you as the manager to change things. The most common personality profile tools used at the moment are the Myers-Briggs Type indicator where you a put into 1 of 16 “families” depending on how you answer questions in the four principal functions; Sensation, intuition, feeling and thinking. You then combine the output to find your grouping.


Kinda useful I guess… Do I need to know this about my team, does it offer any value? 

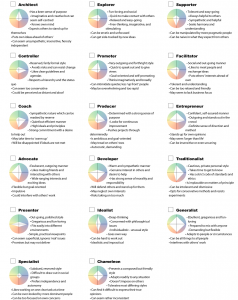
The second and newer kid on the block is the Facet 5, the most modern and advanced measure of personality available today, a bold statement.  Similar in it’s approach you answer a number of questions, you are then given an individual profile and placed into one of 17 “families”. Facet 5 does give you a personal profile and teamscape report with your engagement and I have just run through this with my current management team, it was a fun afternoon. There weren’t really any surprises and we continue to perform well as a team. The Facet 5 families


And for those of you who are curious… ENTJ & Promoter… My final thought, my management philosophy (and title of my as yet unwritten management book) is “don’t be a cunt”, this has served me much better than any personality profiling.

Outcome Based Delivery

Outcome Based Delivery

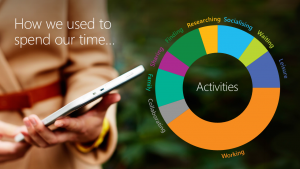
I hate presenteeism, let me get that out of the way first… I hate the person who is first in and last out and their smugness. It drives me insane. Flex sheets, holiday balances, minimum hours, etc, etc… who cares? I don’t. What I want from my staff is the job to be done, sometimes this will take 2 hours in a day, sometimes 12… Do they have to do those hours in the office? Hell no. Costa, McDonald’s, home all suitable work locations. Working at 2 in the morning or 11 at night, I don’t care as long as the job is done (and you are working when you want too). Why do I feel like this? Mainly because we have unnecessarily shackled ourselves to Victorian values, I accept you have to be in a factory when it’s opening and making widgets, but for any modern office based team there is no need. The tools at our disposal now make it possible to work from anywhere at any time. My preferred way of looking at this is we have reconfigured our day. The slides below is how Microsoft describe how we used to spend our time and how we do now. My day is certainly made up of “moments” now, I go into the office to socialise with the team and to have meetings that are best face to face. I work from home one day a week, this gives me the freedom to see Alice off to school and be there when she gets home. My work pattern on my work from home days goes something like this get up, go for a run, grab coffee, work from 6-7, see Alice to school, work 7.30 – 11, have a break do bits and pieces, work 13-15, see Alice home from school and eat, work 20-22.30… As you can see my day is about the same length as if I go in, but… I get more done as I don’t have to focus on anything else. I also don’t spend 4 hours of the day commuting. Soooo what do I need to give the team the ability to this? It’s simple… The right tools. Personally I have settled on Office 365, but Google’s G-Suite or Amazon WorkXXX or ZoHo will all give you the ability to enable the workforce to do this.

OPNSense & Duo

OPNSense & Duo

Set the OPNSense LDAP connection to use the DN rather than the domain\user format or DUO fails to recognise it as the same user. By default the Authentication Proxy doesn’t require 2FA for the first bind in a connection. This is to support systems that bind as a service account, search for the user account, and then bind as the user. It looks like your system may connect and bind as the service account, then disconnects, then connects again to bind as the end user. Look at the exempt_primary_bind and exempt_ou_1 options  and try settingexempt_primary_bind=false and exempt_ou_1=the DN of the service account.

OPNSense & OVH/SyS

This is much simpler in OPNSense

Add gateway

System -> Gateways -> All

Add Gateway

Change Interface to WAN.

Add your primary OVH IP gateway in the “Gateway” field (this will almost certainly not be the gateway for your IP address block) and tick the “far gateway” box.

Hit save and then reload

Adding more IPs

Go to the firewall -> virtual IPs

Add an IP Alias, add the IPs one at a time with a /32

Your IPs are now ready to use!

LAN Internet

Firewall -> NAT -> Outbound

Manual Outbound NAT rule generation. If it isn’t created automatically add a rule with the Interface of WAN, source of your internal IP (192.168.1.x/24) & any VPN IP leave everything else as default and save. Check that your WAN address is chosen rather than interface address (or your outgoing traffic will come from any of your external IPs)

Monitoring ESXi with Nagios

Monitoring ESXi with Nagios

Using the excellent box292_check_vmware plugin and check_esxi_hardware.py script, you can get really great visibility of your ESXi servers.

Notes
For the box293 plugin, you need to have a VMA (details in the manual below).

For the ESXi Hardware you need to install pywbem (apt-get install python-pywbem) and on ESXi 6.5 you need to enable wbem (on the server type: esxcli system wbem set –enable true)

Firewall ports: 443 & 5989 are needed between the monitoring server, VMA and ESXi Hosts

ESXi Checks
Add a server on the VMA – port 443 needs to be open

/usr/lib/vmware-vcli/apps/general/credstore_admin.pl add --server IP.ADDRESS  --username root 

Check it works

/usr/lib/nagios/plugins/check_by_ssh -E 1 -l vi-admin -H VMA.IP -C "~/box293_check_vmware.pl --server ESXi.IP --check Host_OS_Name_Version"

Host Datastore Check

/usr/lib/nagios/plugins/check_by_ssh -E 1 -l vi-admin -H VMA.IP -C "~/box293_check_vmware.pl --server ESXi.IP --check Datastore_Usage --name "ESXI Datastore Name" --warning datastore_free:750 --critical datastore_free:700"

$ARG1$ server
$ARG2$ datastore name
$ARG3$ warning Gb
$ARG4$ critical Gb

Host Snapshot(s) Check

/usr/lib/nagios/plugins/check_by_ssh -E 1 -l vi-admin -H VMA.IP -C "~/box293_check_vmware.pl --server ESXi.IP --check Guest_Snapshot --host ESXi.IP --warning snapshot_age:5 --critical snapshot_age:15"

$ARG1$ Server
$ARG2$ Warning
$ARG3$ Critical