Canary Light & Power Cuts
This post is going to be quite wordy! We’ve had a number of powercuts recently and like any smarthome my house takes time to reboot.
There have been a couple of issues when the power comes back, the first is some of my smartlights don’t support power restoration states, so they come on as soon as power comes back.
This got me thinking, then I came across the “canary light”. This is a device that always comes on when the power resumes (just a standard tuya bulb in my case).
When this light turns on home assistant then triggers an automation that turns off all the lights (after 2 mins, to make sure that everything is back up) that don’t support power restoration. It also emails me to tell me that power has been restored. I have tested it a couple of times and it works really well. Thankfully none of the devices that power on are in bedrooms or waiting for 2 minutes in the middle of the night would definitely be bad!
I also purchased a UPS (I know, I know, but I’ve been spoiled by good power for a long time) and hooked it up to my server, using NUT it will shutdown when the battery gets low and it will email me.
I have an old TP-Link WR802N which can be used as an access point. I have connected this to a port on my server for power and used a spare NIC in my proxmox server and added it as a bridge. This gives me wifi in the event of power lose. It’s small and is running really well off the PC’s USB port. If you are going to do this you will need to make sure you get the v1 version as it’s power requirements are a lot lower than later versions.
That’s wifi and lights / smarts covered off.
The final part is my internet connection, this comes in the other side of the house to my study. Currently my vigor “modem”, sits next to the phone socket and then I use powerline to get it across the house. As you will have probably guessed, power line doesn’t work when there is no power. So I will be running a new cable round the house to deliver the phone line to the study and then I will move the vigor to the study!
Job nearly done!
Postfix From Rewrite
Quick article about re-writing the from address from postfix. First install the libsasl2-modules.
Add the following to main.cf
sender_canonical_classes = envelope_sender, header_sender
sender_canonical_maps =  regexp:/etc/postfix/sender_canonical_maps
smtp_header_checks = regexp:/etc/postfix/header_check
</pre class="code highlight" lang="shell"></span class="line" lang="shell">
Then create the files and their contents
/etc/postfix/sender_canonical_maps
/.+/ newemail@domain.com

/etc/postfix/header_check
From:.*/ REPLACE From: newemail@domain.com
Reload Postfix and test
mail -s “Test Subject” user@example.com < /dev/null
Check the mail logs to see if it’s successful. This trick is really useful if you use a 3rd party to relay email and they require some form of domain or address authentication.
Check_RSS
An old plugin back to life!
Below is the check_rss.py script for pulling RSS feeds into your monitoring platform. I’m currently using ITOpenCOCKPIT, although I have used it with nagios before that.
You do need a couple of dependencies. On ubuntu 22.04 these are:
- python3
- python3-feedparser
#!/usr/bin/python3

"""
check_rss - A simple Nagios plugin to check an RSS feed.
Created to monitor status of cloud services.

Requires feedparser and argparse python libraries

  python-feedparser

on Debian or Redhat based systems

If you find it useful, feel free to leave me a comment/email
at http://john.wesorick.com/2011/10/nagios-plugin-checkrss.html


Copyright 2011 John Wesorick (john.wesorick.com)

This program is free software: you can redistribute it and/or modify
it under the terms of the GNU General Public License as published by
the Free Software Foundation, either version 3 of the License, or
(at your option) any later version.

This program is distributed in the hope that it will be useful,
but WITHOUT ANY WARRANTY; without even the implied warranty of
MERCHANTABILITY or FITNESS FOR A PARTICULAR PURPOSE.  See the
GNU General Public License for more details.

You should have received a copy of the GNU General Public License
along with this program.  If not, see <http://www.gnu.org/licenses/>.
"""

import argparse
import datetime
import sys

import feedparser


def fetch_feed_last_entry(feed_url):
    """Fetch a feed from a given string"""

    try:
        myfeed = feedparser.parse(feed_url)
    except:
        output = "Could not parse URL (%s)" % feed_url
        exitcritical(output, "")

    if myfeed.bozo != 0:
        exitcritical("Malformed feed: %s" % (myfeed.bozo_exception), "")
    if myfeed.status != 200:
        exitcritical("Status %s - %s" % (myfeed.status, myfeed.feed.summary), "")

    # feed with 0 entries are good too
    if len(myfeed.entries) == 0:
        exitok("No news == good news", "")

    return myfeed.entries[0]
def main(argv=None):
"""Gather user input and start the check"""
description = "A simple Nagios plugin to check an RSS feed."
epilog = """notes: If you do not specify any warning or
critical conditions, it will always return OK.
This will only check the newest feed entry.
Copyright 2011 John Wesorick (http://john.wesorick.com)"""
version = "0.3"
# Set up our arguments
parser = argparse.ArgumentParser(description=description, epilog=epilog)
parser.add_argument("--version", action="version", version=version)
parser.add_argument(
"-H",
dest="rssfeed",
help="URL of RSS feed to monitor",
action="store",
required=True,
)
parser.add_argument(
"-c",
"--criticalif",
dest="criticalif",
help="critical condition if PRESENT",
action="store",
)
parser.add_argument(
"-C",
"--criticalnot",
dest="criticalnot",
help="critical condition if MISSING",
action="store",
)
parser.add_argument(
"-w",
"--warningif",
dest="warningif",
help="warning condition if PRESENT",
action="store",
)
parser.add_argument(
"-W",
"--warningnot",
dest="warningnot",
help="warning condition if MISSING",
action="store",
)
parser.add_argument(
"-T",
"--hours",
dest="hours",
help="Hours since last post. "
"Will return critical if less than designated amount.",
action="store",
)
parser.add_argument(
"-t",
"--titleonly",
dest="titleonly",
help="Search the titles only. The default is to search "
"for strings matching in either the title or description",
action="store_true",
default=False,
)
parser.add_argument(
"-p",
"--perfdata",
dest="perfdata",
help="If used will keep very basic performance data "
"(0 if OK, 1 if WARNING, 2 if CRITICAL, 3 if UNKNOWN)",
action="store_true",
default=False,
)
parser.add_argument(
"-v",
"--verbosity",
dest="verbosity",
help="Verbosity level. 0 = Only the title and time is returned. "
"1 = Title, time and link are returned. "
"2 = Title, time, link and description are returned (Default)",
action="store",
default="2",
)
try:
args = parser.parse_args()
except:
# Something didn't work. We will return an unknown.
output = ": Invalid argument(s) {usage}".format(usage=parser.format_usage())
exitunknown(output)
perfdata = args.perfdata
# Parse our feed, getting title, description and link of newest entry.
rssfeed = args.rssfeed
if rssfeed.find("http://") != 0 and rssfeed.find("https://") != 0:
rssfeed = "http://{rssfeed}".format(rssfeed=rssfeed)
# we have everything we need, let's start
last_entry = fetch_feed_last_entry(rssfeed)
feeddate = last_entry["updated_parsed"]
title = last_entry["title"]
description = last_entry["description"]
link = last_entry["link"]
# Get the difference in time from last post
datetime_now = datetime.datetime.now()
datetime_feeddate = datetime.datetime(
*feeddate[:6]
) # http://stackoverflow.com/a/1697838/726716
timediff = datetime_now - datetime_feeddate
hourssinceposted = timediff.days * 24 + timediff.seconds / 3600
# We will form our response here based on the verbosity levels. This makes the logic below a lot easier.
if args.verbosity == "0":
output = "Posted %s hrs ago ; %s" % (hourssinceposted, title)
elif args.verbosity == "1":
output = "Posted %s hrs ago ; Title: %s; Link: %s" % (
hourssinceposted,
title,
link,
)
elif args.verbosity == "2":
output = "Posted %s hrs ago ; Title: %s ; Description: %s ; Link: %s" % (
hourssinceposted,
title,
description,
link,
)
# Check for strings that match, resulting in critical status
if args.criticalif:
criticalif = args.criticalif.lower().split(",")
for search in criticalif:
if args.titleonly:
if title.lower().find(search) >= 0:
exitcritical(output, perfdata)
else:
if (
title.lower().find(search) >= 0
or description.lower().find(search) >= 0
):
exitcritical(output, perfdata)
# Check for strings that are missing, resulting in critical status
if args.criticalnot:
criticalnot = args.criticalnot.lower().split(",")
for search in criticalnot:
if args.titleonly:
if title.lower().find(search) == -1:
exitcritical(output, perfdata)
else:
if (
title.lower().find(search) == -1
and description.lower().find(search) == -1
):
exitcritical(output, perfdata)
# Check for time difference (in hours), resulting in critical status
if args.hours:
if int(hourssinceposted) <= int(args.hours):
exitcritical(output, perfdata)
# Check for strings that match, resulting in warning status
if args.warningif:
warningif = args.warningif.lower().split(",")
for search in warningif:
if args.titleonly:
if title.lower().find(search) >= 0:
exitwarning(output, perfdata)
else:
if (
title.lower().find(search) >= 0
or description.lower().find(search) >= 0
):
exitwarning(output, perfdata)
# Check for strings that are missing, resulting in warning status
if args.warningnot:
warningnot = args.warningnot.lower().split(",")
for search in warningnot:
if args.titleonly:
if title.lower().find(search) == -1:
exitwarning(output, perfdata)
else:
if (
title.lower().find(search) == -1
and description.lower().find(search) == -1
):
exitwarning(output, perfdata)
# If we made it this far, we must be ok
exitok(output, perfdata)
def exitok(output, perfdata):
if perfdata:
print("OK - %s|'RSS'=0;1;2;0;2" % output)
else:
print("OK - %s" % output)
sys.exit(0)
def exitwarning(output, perfdata):
if perfdata:
print("WARNING - %s|'RSS'=1;1;2;0;2" % output)
else:
print("WARNING - %s" % output)
sys.exit(1)
def exitcritical(output, perfdata):
if perfdata:
print("CRITICAL - %s|'RSS'=2;1;2;0;2" % output)
else:
print("CRITICAL - %s" % output)
sys.exit(2)
def exitunknown(output):
sys.exit(3)
if __name__ == "__main__":
result = main(sys.argv)
sys.exit(result)
Yummy, yummy Pis – June 2022 Update
Yummy, yummy Pi's - June 2022 Update
I’ve decided this will become a running update of the Pi’s I am using and what I am doing with them. Updates will be posted to the top of the page.

June 2022 – Update
Even more has changed, you can now run proxmox and OPNSense (both limited) on pi’s. I hope both these projects mature, as OPNSense Pi at the caravan would be amazing and a proxmox quorum pi at home would help a lot!
Ironically the Pi shortage has got worse and isn’t likely to improve for another year or so, I no longer us Pi’s behind TVs so I have managed to get some back into rotation
So here we go:
- Pi 4 2Gb – OctoPi
- Pi 4 2Gb – Pi Sync
- Pi 4 2Gb – Pi KVM
- Pi 4 2Gb – Caravan HA
- Pi 4 2Gb – Caravan Pi
- Pi 4 2Gb – Frame Pi
- Pi 4 4Gb – CCTV Pi
- Pi 400 – Study Pi
- Pi 3b + – Wildlife Cam
Spare Pi’s
- 2x Pi 2
- Pi 3+
- Pi 4 8Gb
- Pi 4 1Gb
- Pi Pico
- 2x Zero WH
- Zero
- Zero 2
May 2021 – Update
A lot has changed in home Pi world… ESX for ARM has been released and I’ve been testing this, it works and is stable. Hopefully OPNSense will come to the Pi natively and then there will be some interesting opportunities to run Pi firewalls, I have looked at OpenWRT on the Pi, but prefer the completeness of the xSense ecosystem. I’ve upgraded a couple of Pi’s due to performance issues. I have also migrated the Pi 400 to SSD and it’s a lot quicker. I have been keeping an eye on SD card performance and have settled on Samsung Evo Plus and SanDisk Ultras / Extreme. There appears to be a shortage of 2Gb Pi’s at the moment, I need an additional one to replace the Pi in the kitchen which I am currently using for the CCTV Pi.
A full list below:
- Pi 4 1Gb – CCTV Pi (upgraded from a Pi 3+ for more streams (including 3D printer and new Eufy Cams)
- Pi 4 2Gb – OctoPi (3D printer control)
- Pi 4 2Gb – Pi Sync
- Pi 4 2Gb – Pi KVM
- Pi 4 2Gb – Caravan HA
- Pi 4 2Gb – Caravan Pi
- Pi 4 4Gb – Bedroom Kodi
- Pi 400 – Study Pi
Spare Pi (s)
- 2x Pi 2
- 2x Pi 3+
- Pi 4 8Gb (currently testing ARM ESXi)
- Pi Pico
- Zero WH
- Zero
- December 2020 – Update
In addition to the Pi’s below, I now have two more in use
- Pi 2 – Backup Pi – Using rsync and rclone to manage all my backups locally and to sync to OneDrive for Business.
- Pi 4 2Gb – Pi KVM – Find out more in this post
I have also managed to purchase a Pi 2 v1.2 to go on the Pi versions board. This completes my collection of historical Pi Bs. When the next version of Pi’s come out the Pi 4’s will slowly be retired to the board!
I am also working on a project with Pi Zero WH’s to create a multizone audio system using Volumio, this project will make use of HifiBerry’s popular DAC Hats as well as some custom integration work. I currently have 3 Pi “audio zones” and am awaiting the hats to begin testing.
Spare Pi(s)
- Pi 2, Pi 3+, Pi 4 8Gb
- Pi Zero WH
- Pi 2 1.2 ready for mounting
Retired Pi(s)
- Pi 3+ – First home assistant server migrated to new proxmox host
Why no love for the Pi A or Compute module? Although I have a good collection of old Pi’s you may notice that I don’t have any Pi A or Pi Compute modules on the list. This is because I don’t use them! I’ve never had a use for the compute modules. I do have a Pi A in a wildlife camera, but this currently isn’t being used. I love the Pi B and Zero form factors which is why I use them the most, if I have a project that ever uses the other form factors, I may well collect the back catalogue of those too!
Original Post – November 5th
From the moment they were announced I knew that the way I did computing at home had changed. Ideal as test boxes, development, media players and now even mini ESX servers! I’ve used them for many things…
The Pi’s I currently have in use are:
- Pi 4 1Gb – Kitchen LibreELEC
- Pi 4 2Gb – 2nd Device in Lego Room
- Pi 4 4Gb – Bedroom LibreELEC
- Pi 400 – 2nd Device in Study
- Pi 3+ – CCTV Viewer
- Pi 3+ – Garage
- Pi 3+ – Home Assistant
I have used them for other projects in the past including getting started with Home Assistant, mini ESXi Server, custom automations, OSMC media player, Plex Server, learning things with Ali, Wildlife Cameras, the list goes on. I hope they are around for a long time to come!
In the gallery below you can see the latest Pi 400, my display of Pi’s from the original Pi to the Pi 3 B+ (with space for the Pi4 1, 2, 4Gb version… the 8Gb version will start a new board). Next are my Pi’s ready for use (Pi Zero WH, Pi 3 B+ and Pi 4 8Gb), I also have a Pi 2 in the cupboard should I need something older to play with and yes that is a ZX Spectrum +2 behind them. Finally my Pi Zero Board up to the latest Pi Zero WH.
Proxmox Nagios Monitoring
Using the excellent check_pve.rb script I have setup comprehensive monitoring for proxmox servers, both locally and remotely.
In case the script disappears, here are some useful bits
pveum useradd monitoring@pve -comment "Monitoring User"
pveum passwd monitoring@pve
pveum roleadd PVE_monitoring -privs "Datastore.Audit,Sys.Audit,Sys.Modify,VM.Audit"
pveum aclmod / -user monitoring@pve -role PVE_monitoring
Usage:
check_pve v0.2.5 [https://gitlab.com/6uellerBpanda/check_pve]

This plugin checks various parameters of Proxmox Virtual Environment via API(v2)

Mode:
  Cluster:
    cluster         Checks quorum of cluster
  Node:
    smart           Checks SMART health of disks
    updates         Checks for available updates
    subscription    Checks for valid subscription
    services        Checks if services are running
    storage         Checks storage usage in percentage
    cpu             Checks CPU usage in percentage
    memory          Checks Memory usage in gigabytes
    io_wait         Checks IO wait in percentage
    net_in          Checks inbound network usage in kilobytes
    net_out         Checks outbound network usage in kilobytes
    ksm             Checks KSM sharing usage in megabytes
  VM:
    vm_cpu          Checks CPU usage in percentage
    vm_disk_read    Checks how many kb last 60s was read (timeframe: hour)
    vm_disk_write   Checks how many kb last 60s was written (timeframe: hour)
    vm_net_in       Checks incoming kb from last 60s (timeframe: hour)
    vm_net_out      Checks outgoing kb from last 60s (timeframe: hour)

Usage: check_pve.rb [options]

Options:
    -s, -H, --address ADDRESS        PVE host address
    -k, --insecure                   No SSL verification
    -m, --mode MODE                  Mode to check
    -n, --node NODE                  PVE Node name
    -u, --username USERNAME          Username with auth realm e.g. monitoring@pve
    -p, --password PASSWORD          Password
    -w, --warning WARNING            Warning threshold
    -c, --critical CRITICAL          Critical threshold
        --name NAME                  Name for storage
    -i, --vmid VMID                  Vmid of lxc,qemu
    -t, --type TYPE                  VM type lxc or qemu
    -x, --exclude EXCLUDE            Exclude (regex)
        --timeframe TIMEFRAME        Timeframe for vm checks: hour,day,week,month or year
        --cf CONSOLIDATION_FUNCTION  RRD cf: average or max
    -v, --version                    Print version information
    -h, --help                       Show this help message
Proxmox P2V Migration
Windows Physical Server to Proxmox
I am fortunate enough that even with my main job, I am allowed to take side hustles. These are normally technical in nature, something that my primary role doesn’t involve so much any more, and I only take the ones that give me an opportunity to learn.
Just before Christmas a friend got in touch, one of their customers was being charged a huge amount for colocation of a single server (as it turns out protected by a woefully under powered firewall). I hadn’t done a physical to virtual migration (P2V) in about 10 years so I quoted for the job and we won the business.
As part of the quote we suggested a trial migration, as the customer was wary of virtualisation, their current provider had actively discouraged it. It was time to find a P2V solution… In the past I have used the vmware convertor tool, there were two issues with this, firstly it hasn’t been updated in years (and has now been pulled) and secondly I wanted a proxmox compatible disk at the end.
Looking for new tool proved harder than I expected, until I stumbled upon Disk2vhd, a tool provided by Microsoft’s sysinternals “brand”. This tool will create a VHDX (or VHD) file for a physical drive and yes you can save it to the same drive!
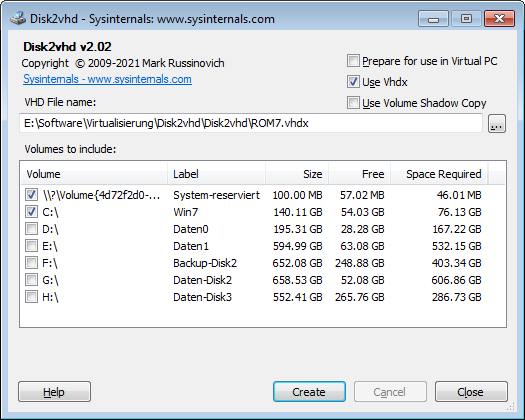
As you can see the GUI for Disk2vhd is incredibly easy to use. I learnt a couple of things, the first is to make sure you create the image at a disk level not a partition level else you end up with a confusing set of VHDs. Also don’t create one VHD and then disk2VHD that partition (because the image gets huge).
Once you have the VHDx images copy them to your proxmox server and convert them to qcow2
qemu-img convert -O qcow2 /var/lib/vz/harddrives/XXXX.vhdx /var/lib/vz/images/xxx/vm-xxx-disk-X.qcow2
That’s it, Disk2vhd is such a great tool and it’s available for free and appears to be updated!
Now you have the qcow images you can add them to your target VM. You will need to do a little prework to the VM before you can get the best performance.
What I did:
– Create an empty 1Gb disk with the virtio controller (this forces the virtio driver install)
– Add the converted disk(s) to the VM as IDE
– Boot the server off the IDE disks
– Install the latest virtio drivers
– Change the IDE disks to virtio and remove the empty disk
– Boot and check
The live migration has been booked and I will update this post once this is complete with any further information.
Backing up a Pi (with USB HDD)
Pi Backup
Time for another text based pi article.. sorry!
Attach the USB disk to the pi.
Next download pi shrink
wget https://raw.githubusercontent.com/Drewsif/PiShrink/master/pishrink.sh
sudo chmod +x pishrink.sh
sudo mv pishrink.sh /usr/local/bin
Next check for the correct paths
lsblk
Now run a dd copy to create the image
sudo dd if=/dev/mmcblk0 of=[mount point]/myimg.img bs=1M
Finally shrink the image
sudo pishrink.sh -z myimg.img
You now have a size optimized image that you can restore using the “official” pi image writer software. You can stick this in a cron job to create a regular image backup of any pi.
VNC
If you are cloning to test or deploy into another Pi, you will need to delete the VNC config or you will get a “cloned” error in the VNC client and it could stop working. Luckily it’s simple to fix, on the cloned machine do the following:
sudo systemctl stop vncserver-x11-serviced
sudo rm -rf /root/.vnc
sudo systemctl start vncserver-x11-serviced
ZFS Expand with new disk
I realised that one of my 3Tb drives was very, very old. It wasn’t failing yet, but it would probably be best to proactively replaced it. The other drive in the mirror is a 4Tb drive, so I took the opportunity to buy another 4Tb drive and add it to the ZFS mirror… This was so simple it’s scary.
Firstly I removed the old drive from the mirror.
#zpool detach <Pool Name> <Device to Remove>

i.e #zpool detach SATAPool sdd
Then I shutdown the machine removed the old drive and put the new one in. When the box rebooted I added the new disk to the mirror.
#zpool attach <Pool Name> <Existing Disk><New Disk>

i.e #zpool attach SATAPool sdc sdd
I let it resilver… but it didn’t auto expand. The main reason for this was I didn’t have autoexpand turned on.
#zpool set autoexpand=on <Pool Name>This didn’t fix the issue, but it did show the space was available. The next thing I did was to use the online -e on every disk in the mirror.
#zpool online -e <Pool Name> <Disk Name>

i.e. #zpool online -e SATAPool sdd
And then I had an extra Tb to play with!
Hyper-v to Proxmox
This one is going to be word and code heavy.
Firstly shutdown the hyper-v gen2 VM.
Copy the VHDX to the proxmox server, remember you will need twice the space of the VHDX available temporarily to completed the move.
Create the VM on Proxmox, you will need to create it using a OVMF (UEFI) BIOS. You will also need to create a 1Gb virtio hard disk (again this is temporarily)
Make a note of the VM ID (i.e. 103), you’ll need this to import the hard disk.
Once the VHDX is copied across you need to import the disk
qm importdisk VMID SORCEDISK.vhdx DATASTORE --format qcow2
i.e. qm importdisk 103 /tmp/data.vhdx SATA –format qcow2
This will then import the disk to the VM.
Next you need to head over to the VM in proxmox and attach the disk in the gui, you will need to install it as SATA or IDE (not virtio yet)
Boot the machine up into windows, install the latest tools, the temporary 1Gb disk we installed earlier will mean the virtio drivers are installed.
Shut the VM down, remove and reattach your windows drive as virtio, remove and delete the temporary 1Gb drive and turn the machine back on. If your machine had a static IP you will need to readd it, you may get a warning about it being assigned to another NIC. You can ignore this, however, I would recommend removing it at some point!
You can now delete the VHDX file you copied to the proxmox server
Job done!